Friday, January 31, 2014

If you are a fan of country cottages, you are going to love this. Drool at these carefully crafted country inspired bedrooms with rustic flowing details and old cottage charm.


With a little imagination and a few simple DIY tricks, create one of a kind hardware and tiebacks for your curtains from everyday objects.

By : Brian Patrick Flynn


Braced With Bracelets 

Many women's bracelets and men's cuffs are the right size for cinching single-width drapery panels. Put bracelets and cuffs to creative use as tiebacks by placing them around drapery panels and hanging freely, or create a more permanent look by attaching them to the wall with Velcro.


Branching Out 

Sometimes the perfect object for a lightweight drapery rod may be sitting right outside your window. Branches can make for excellent, sculptural drapery rods with a few simple do-it-yourself updates. Search for a branch with the proper length and width to fit above a window and handle the weight of the chosen drapery panel. Next, cut it to size and spray-paint it in a color which contrasts well against the wall. Lastly, secure standoffs, ready-made drapery rod brackets or L brackets directly to the wall using plastic drywall anchors, then attach the branch with screws or bailing wire.


A Touch of Menswear 

When draperies need to be pulled back from or tied back in the middle of a window, neckties are a stylish solution. While freestanding tiebacks simply require a proper Windsor knot slipped up along the bottom of a drapery panel, fixed tiebacks are created with Velcro placed along the back of the neck loop and attached directly to the wall.


A Nod to Nautical 

Sisal rope has endless uses when it comes to decorating. To add a nautical touch to windows, consider adding small two-by-two-inch wooden blocks above a window. Then, after cutting a spool of rope to size, knotting each end and sliding drapery rings or panels directly onto it, attach rope securely to blocks with decorative screws and washers. Depending on how tight the rope is pulled before being secured to each block, a more tailored or relaxed look can be achieved.


Fashion Forward 

Add a fashionable touch to your curtains by repurposing an old leather belt into a stylish and preppy tieback. Wrap the belt around the gathered drapery panel and add an additional hole to the belt using a nail and hammer. Secure the belt to the wall approximately 10 inches in from the front edge of the belt buckle. Wrap the belt around the drapery panel and buckle in place with the brand-new hole.


Stylishly Sporty 

Bring an unexpected touch to a man cave with golf-club drapery rods placed above small windows. In order to use the golf club successfully, pick up C hooks from a home improvement store, secure them into the wall above and alongside the window, slide panels onto the clubs, then secure them to the C hooks.


Nifty Necklace 

Get those seldom-worn accessories out of the jewelry box and in plain sight by using necklaces as curtain tiebacks. To ensure the proper effect, stick with necklaces large and thick enough to be seen from different vantage points in the room. If thin pieces are used, they may lose impact and look more like clutter than decorative tiebacks.


Design Home Run 

Bring the ball game to a boys' room or grownup guys' space with baseball drapery rod finials. To turn the baseball into a finial, use a paddle bit slightly larger in diameter than the rod, drilling directly into one side of the baseball. Next, position the baseball directly along the end of the rod, securing a tight fit by hand.


Toy Story 

Many finials made specifically for children's rooms are branded, themed or too trendy to withstand the test of time. Put a classic spin on a colorful, kid-friendly space by repurposing wooden blocks as finials with wood glue, a drill and paddle bit. Once the proper hole is drilled into the side, secure the blocks to the end of the drapery pole with properly sized screws or bolts.

Get inspired by this Easy 2013 Fall Decorating Projects Ideas .These decorating ideas include several no-hassle projects that are full of autumnal textures and colors.

I hope that you will like and find it useful for you ... Enjoy it !!


Embrace the bounty of beautiful fall colors with a seasonal tablescape. The star of this table is a stunning arrangement of late-blooming flowers mixed with bold red-orange leaves. Small gourds and pumpkins are also randomly placed around the table, creating a laid-back vibe perfect for fall entertaining.


Display freshly fallen leaves. Position single leaves, either pressed or fresh, in small glass vases, and place them on various surfaces around the house. (We used old lab beakers look for them at antiques stores.) The best thing about this sweet and simple display is that when the leaves start to crumble and brown, you can easily replace them.

 DIY Tip: To press leaves, place them between layers of newspaper and under a heavy stack of books. Let the leaves dry for a couple of days. Then, to enhance their color, iron the leaves between pieces of waxed paper, using a pressing cloth to keep wax off the iron. Pressed leaves also can be purchased at local crafts stores.


Candles are the perfect way to create a soft glow that warms up a cool autumn evening. Hot-glue Indian corn to the outside of a pillar candle for a colorful accent. As you burn the candle, make sure the flame doesn't get too close to the corn.


Artfully arrange fall items on a bookshelf or in an open cabinet. Put platters on their sides, fill vases with colorful flowers, and pile bowls with mini gourds to create a diverse display. Try heaping small items, such as acorns, bright berries, and sweet gum seedpods, into glass bowls. Adhere a dried fern frond to a platter with spray adhesive to embellish a simple plate.


Dress up your furniture with cozy items in seasonal colors. Here, a wicker chair is draped with a warm orange throw, and a maple leaf pillow sits comfortably on top. Perk up a plain pillow by enlarging a leaf using a copier to make a pattern. Cut the pattern out of wool felt and attach it to the pillow cover using iron-on fusible backing. Blanket-stitch around the edges.


Fresh apples are a stylish and seasonal way to anchor tablecloths and napkins. Simply use an awl to pierce a channel through two apples, and thread twine through the bottom of one and the top of the other. Leave enough twine to hang over the edge of the table 6-8 inches. Tie a twig at each end to keep the apples from sliding off.


Greet your guests with a "welcome" pumpkin. Use paint to write your message on a pumpkin, and set it near the entrance to your home.


Take a display of mini pumpkin gourds to the next level by adding height. Bowls, cake plates, and candlesticks are perfect for creating an interesting display. Paint the pumpkins metallic silver for a dramatic effect.


Easily transform an ordinary table runner into playful fall decor using nothing more than felt and hot glue. Purchase felt in autumn-inspired colors from your local crafts store. Trace different sizes of leaves and twigs onto the felt, cut them out, and place the pieces in a pleasing pattern onto the table runner. Adhere the twigs onto the surface first using a hot glue gun to ensure correct placement of the leaves. Then glue down each leaf onto the top of one of the tiny twigs. The result is a festive table runner perfectly suited to fall entertaining.


Even the simplest of objects, when displayed on a larger scale, can have a stunning affect. Here, a tall cylindrical vase is filled to the top with basic white pumpkins and is perched atop a dining room buffet for an eye-catching display.


Bring a touch of the great outdoors inside with this adorable acorn pillow. Simply purchase a solid-color pillow in the fabric and color of your choice and a large acorn iron-on. Place the acorn in the center of the pillow, follow the directions included with the iron on transfer, and you have a festive and fun throw pillow that blends perfectly with other fall decor.


Festive tablescapes set the scene for fall entertaining. Give your typical tableaux a twist by incorporating a non-fall color. Here, the bright sky blue plate breaks up the rich reds and vibrant oranges typically used in fall decorating. Try pairing plum or bordeaux hues with golden yellows or sage or olive greens with chocolate browns.


Transform your everyday bookshelf into an autumnal display with a few simple tweaks. First, to create a consistent and graphic look, cover books with festive paper we love these tree and floral-inspired prints. Then incorporate natural elements and accessories in fall hues.


To create a simple and sweet fall centerpiece, look no further than your own backyard. To re-create this look, simply gather fallen twigs or snip a few off of a nearby tree and place them in an oversize wire basket. Amp up the arrangement by incorporating a few store bought branches decked out in faux fall berries. A large basket of apples and a random variety of gourds add texture and rich autumnal colors.


These English country style kitchen sets from County Kitchen predominantly reflect a traditional style but not without a modern twist on tradition.


Thursday, January 30, 2014

Fall entices us to spend more time in the cozy warmth of hearth and home, and often that means gatherings around the table. Luckily, there are many ways to update your table without splurging on new dishes and linens. Look instead to items from nature, quick and easy DIY ideas, budget-friendly finds and long-lasting centerpieces, to create a fresh, new look without a lot of shopping. Read on for 12 cheap and chic ideas that will make you smile each time you pass by your table.

I hope that you will like and find it useful for you ... Enjoy it !! 


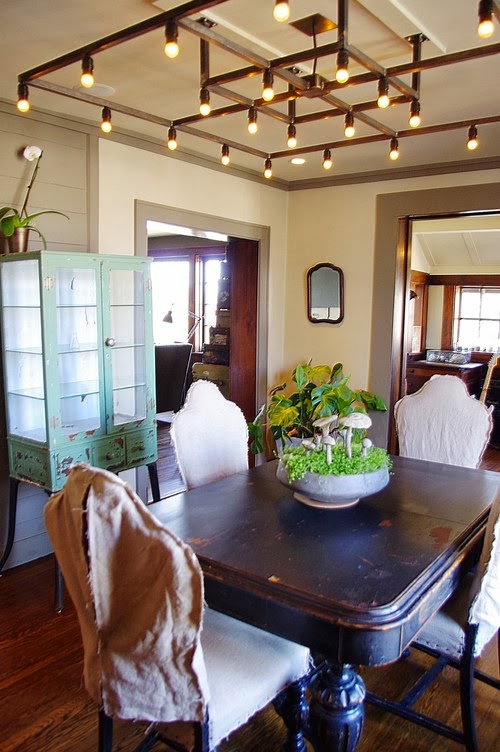
Create a woodland-inspired living centerpiece. 

Plant any ground cover you like in a shallow, mod pot for a lasting display. Accent it with ceramic mushrooms or foraged wood and stones, and be sure to use a trivet or dish beneath it to protect your table.


Use other items from nature. 

Bare branches can be paired with tea lights or air plants as a sculptural centerpiece. Pheasant or other feathers look striking in a simple cylindrical vase, while sheepskins (real or faux) and a stack of firewood add to the warm, cozy feel. Keep your eyes open in your own backyard, on nature walks  and if all else fails, in the craft store  for supplies you can use in creative ways.


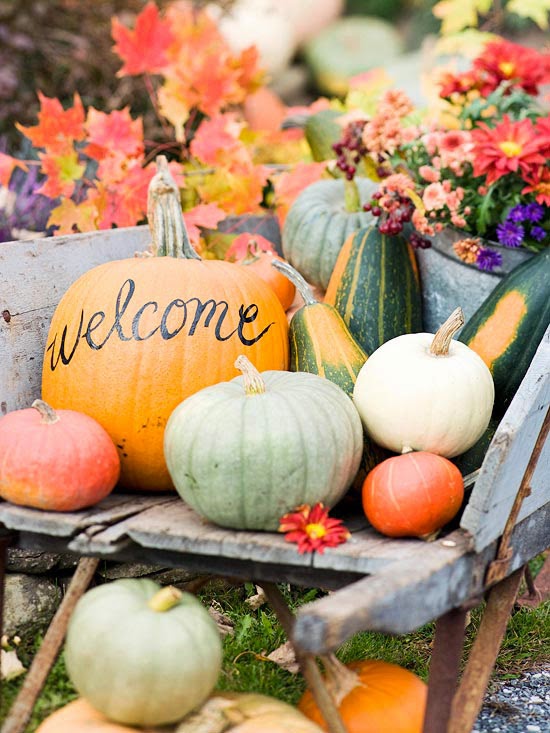
Choose long-lasting items from the farmer's market. 

Look for more durable items like dried persimmons or pomegranates, berries and interesting foliage to extend the life of your arrangement. Whereas fresh flowers last only a week, these finds can last anywhere from one month to a whole season.


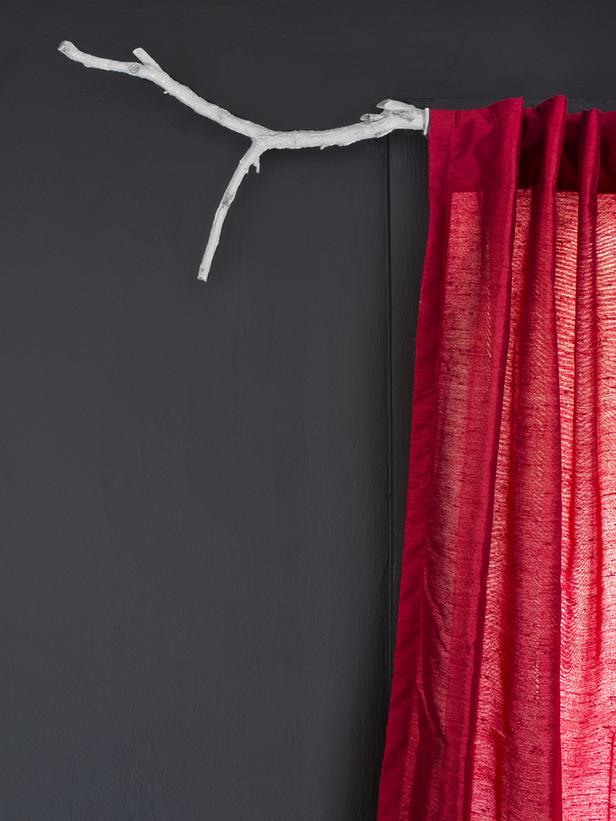
Make a statement with a single swooping branch. 

A vase filled with one lovely, arching branch of foliage or berries takes up enough visual space to stand alone. Pair contrasting hues  like the red berries and blue vessel shown here  for a vibrant look.


Keep arrangements low for easy conversation. 

Casually arrange berries or other small branches along the center of your table. Intersperse candles (be sure to keep branches away from the flames!) and anchor the arrangement on a simple runner.


Spice up your table or chairs with a new hue. 

Embrace the season by painting your table a vibrant, warm color like red or golden yellow. If you are nervous about making a big commitment, try painting just the table legs, or a single bench or chair, and see how the color feels.


Shop your kitchen for creative table decor. 

Think beyond standard vases and planters for centerpieces. Pitchers, teacups, coffee mugs, serving platters and trays, and even soup terrines can all make wonderful containers for seasonal flowers, fruit and candles. Have some pretty herbs growing on your kitchen windowsill? Grab those, too.


Give small items more presence with plates and platters. 

You don't need an overblown centerpiece to make a statement. A small potted plant and a few slender candles can take center stage when elevated on a plate or cake stand. Use pretty cups as bud vases for flowers snipped from your garden (or plucked from a market bouquet) to round out the arrangement.


Use burlap and mason jars. 

Simply cut and fold burlap for a quick, rustic-chic runner or tablecloth. Use mason jars as candleholders, vases or glasses for water or wine. Or create easy embellished vases by wrapping a few of your jars with burlap (secure with hot glue).


Set up a functional display with frequently used items. 

Display silverware in a caddy and pretty cloth napkins in a basket, and keep ready-to-eat fruit on a pedestal or cake stand. If the containers you choose don't match, give them a fresh look with a coat of unifying black or white paint.


Corral favorite objects on a tray. 

Choose items in a tight color palette for a collection that hangs together. Silver paired with mercury glass, and white with wood, are two foolproof combinations.


Include food in your tablescape. 

Nothing is more luscious than perfectly ripe, in season produce, so let your market finds take center stage when you set the table. Place a perfect pear, pomegranate or persimmon on each plate, fill a bowl with figs and grapes, or make a heaping pile of colorful squash.