Friday, April 4, 2014

Are you entertaining this Halloween? Turn your cocktail bar into a "mad laboratory" by serving scary potions and dressing up the bar with spiders, blood and dismembered hands.


Halloween Cocktails

We used old utility car as a beverage bar for a Halloween party. We covered the cart in spider webbing then filled the bar potions, magic spells and some spooky decorations.
 

Make Concoctions

Download and print labels to turn your beverage bottles into serums, potions and magic spells. Our labels are editable, so customize them to your desired poison. Use a glue stick to adhere the labels to the bottles. We used wine and liquor bottles.
 

Add Flesh & Blood

Cut a piece of cardboard to fit on the bottom shelf of the cart. Make some bloody handprints on the cardboard using red craft paint. Add a little oatmeal to the paint if you want a little more flesh and gore. Let the handprints dry then lay the cardboard inside the bottom of the cart.
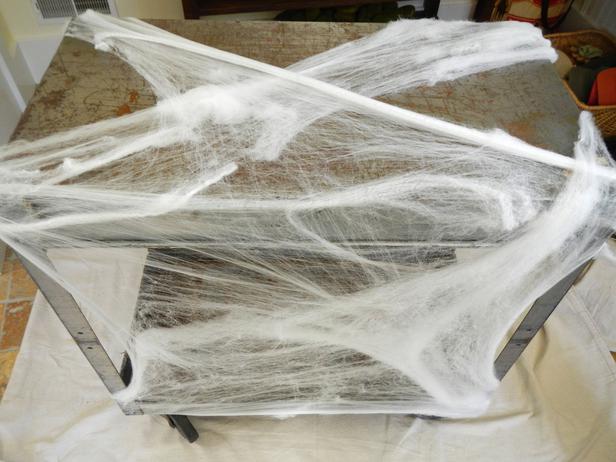
 

Web It

Stretch the white webbing over the cart, use a hot-glue gun to attach it the corners and underneath the edges of the cart. Stretch it out to make it look like a spider web, leave a little room to get to the bottom shelf of the cart
 

Add Giant Arachnid

Place large spider on the web to make it look like it is crawling up the side of the cart. Use a little hot glue if necessary to attach its feet in place.
 

Lend a Helping Hand

Place the cut off hands at the end of the cart (preferably if there is a handle) to make it look like as if they are pushing it. Use hot glue gun on a couple of the fingers to keep them in place.


Set Up Bar

Place the bottles, glassware and a candle on the top of the cart. Then arrange the little spiders in and around them.

Thursday, April 3, 2014

Who said Halloween has to hamper your home decor? From the store to your door, try these easy ideas for celebrating the spooky season in style.


Grim Grinning Ghosts

Lit from within, these burlap ghosts can add a surprisingly whimsical feel to a ghoulish holiday.


Make It Miniature

Handcrafted from natural materials such as tree bark and wood chips, this set of brush ornaments is eco-friendly, biodegradable and a great choice for limited spaces.


A Gorgeous Glow

This stunning pair of pumpkin candleholders is a true work of art. Hand-welded from hand-forged sheet metal, they're simple to light; just pop in the votive candles and enjoy the glow.


A Not-So-Tangled Web

Warning: Real spiders will be very jealous. With 100 glass lights set over a natural twig and handwoven rattan frame, this twig spider web is the prettiest web we've ever seen.


Pretty Paper

Get into the spooky spirit with these spider and skeleton paper lanterns. They're perfect as a pair, or create a cluster for a more dramatic look.


All Lit Up

When you've had your fill of pumpkins and ghosts, try adding some decorative Halloween twigs to the front porch. This set of 5-foot twigs comes pre-lit with 50 orange mini-lights already in place.


Creepy Crawly

Look out! This giant spider measures 6 feet across, making him larger than most trick-or-treaters. And if his size doesn't cause a spooky scene, the flashing red eyes certainly will.


The Perfect Pumpkin

Fool guests with this faux pumpkin that mirrors the size, color and texture of an actual pumpkin, and is complete with a spider carving.
Make Halloween memorable for you and the kids with these spooky, yet chic displays.


Spooky Banner

I designed this spooky banner to hang on my fireplace mantel. If you like crafting with paper, you will love this project. The banner stores easily for you to bring out each Halloween season. 

Faux-Feather Garland

A regular green-leaf garland from the craft store turns into a fabulous Halloween decoration when spray-painted black. The featherlike leaves on the garland we used reminds us of black crows, perfect for the Halloween season.

Chair Garland

To create this garland, we used basic white coffee filters. You just need an easy-to-find inexpensive needle, ribbon or twine and a bit of time to create a ruffled chair garland. Another idea is to make it longer and hang from your mantel or banister.

Creepy, Crawly Lamp

The simplest of ideas can often also be the most effective. This pretty ruffled lamp turns scary with a large rubber spider crawling up the shade

Hand Candy Bowl

 Turn an average white bowl into a spooky candy container by attaching a creepy hand to a foam block (to keep it upright) and then fill with Halloween candy. Kids and adults alike will fear placing their hands into this eerie dish. Will getting the candy be worth the scare?


Hanging Heads

 We love using glitter for Halloween projects, especially black glitter. Find papier mache objects, like these skulls, at the craft store, add glitter using a spray adhesive or glue, then hang from your chandelier with ribbon or string. A sure bet for creeping out your dinner guests.


Head on a Platter

Off with his head! A scary skeleton head looks even creepier when presented on a pedestal cake plate. Just find the most frightening skull you can and put him on display. Screams and squeals are sure to follow.  

Spider Wreath

This fabric wreath is simple to make and can be used for many occasions by changing the embellishments. The mini black-glitter spider clips contrast perfectly with the bright white fabric. With just a few basic materials and tools from the craft store, you can dress up your front door for Halloween.

Wednesday, April 2, 2014

To make this fall porch decoration, we stacked three pumpkins in a planter then adorned the pumpkins in vines, greenery, baby's breath and a few feathers.

Tools and Materials

serrated knife
scissors
hot-glue gun
3 pumpkins (we used faux pumpkins by Funkin)
painter's tarp
greenery (U-shaped) pins
grapevine (twigs)
1 to 2 long bows of artificial greenery (boxwood looking)
2 packages of dried flowers (baby's breath)
5 bunches of feathers
2 to 3 bunches of artificial flowers or grass-like (pom-pom) stems
1 large urn planter


Paint and Prep

In order to be able to stack the pumpkins, break off the stem of the bottom two pumpkins. or cut holes in the bottom of the top two pumpkins. Paint the pumpkins if desired.

Wrap in Vine

On a painter's tarp, layout all the pumpkins and greenery. Start with the bottom pumpkin, unwind the grapevine and cut a piece to go around the bottom of the pumpkin, let some come up from the bottom a little. Use u-shaped pins to hold it in place.


Wrap in Greenery

Cut a piece of the boxwood greenery and place it under the grapevine twigs, use pins to hold it in place.


Add Feathers

Place three of the five bunches of feathers around the grapevine. You may want to use the scissors and cut off most of the stem and then tuck in the rest in between the pumpkin and the grapevine. Use a hot-glue gun (medium heat) to keep in place.


Add Flowers

Cut pieces of the flowers and its greenery then tuck them into the grapevine around the base and glue into place.


Fill in With Baby's Breath

Use dried flowers to fill in the rest, make sure some pieces will hang over the edge of the urn.


Continue onto the Other Pumpkins

Repeat the steps on the upper two pumpkins, but don't use as much decoration as you did on the base pumpkin.


Use the Tarp to Stuff the Urn

We used our tarp not only as a work surface, but we put it in the bottom of the urn to bring the height of the pumpkins up close to the top of the urn. If a tarp doesn't work, try rocks, packing peanuts or old towels. Place the pumpkins in the urn on top of the tarp, allowing it to sink slightly into the middle of the tarp. Make sure none of the tarp shows or the inside edges of the urn.

Fill in Where Necessary

When everything is in place, fill in any blank spaces with more flowers, feathers or even birds.


We stacked three plain pumpkins together then adorned them in spiders to make a spooky Halloween decoration.


To make this adorable pumpkin topiary, we pinned on spiders and wrapped the pumpkins with black yarn.

Tools and Supplies

serrated knife
scissors
hot-glue gun
3 carving pumpkins (we used faux pumpkins from Funkin)
30 to 40 straight pins with a black tops
flashlight
black yarn
small plastic toy spiders
one large spider


Carve and Stack

Carve the top and bottom of the top pumpkin in the stack. Carve the bottom of the middle pumpkin in the stack. This way stack on top of each other and the top one will have an opening for the flashlight.


Insert Pins

Push the black sewing pins into the pumpkins in a random pattern. Leave half of the pin sticking out. Use about 15 pins per pumpkin.


Create the Spider's Web

Starting at the bottom, wrap the yarn around one of the pins then bring it to the next pin, wrap it around and repeat. Keep weaving the yarn back and forth around the pins until you have one big web. If necessary, use the glue gun on the yarn to keep it from moving.


Add Spiders

Tie or glue small strands of yarn to several of the spiders. Tie the strands to the webbing so the spiders will hang down. Then glue some spiders directly to the webbing. Add several to the top to make it look like they are escaping. Place a few on the floor and make them look like they are about to scatter.


Include Mama Spider

Insert a flashlight into the top pumpkin to illuminate the large spider. Then place the spider as if she's escaping, too (again, be careful of the pins).


Tuesday, April 1, 2014

This Halloween, light up your porch with a zigzag-patterned jack-o'-lantern.


We painted and carved chevrons patterns onto three pumpkins, inserted tea-lights then stacked the pumpkins together to create a retro-style topiary. Moss-covered stones were laid around the base of the topiary to give it a little earthy yet eerie feel.

Tools and Materials

serrated knife
jigsaw (optional)
3 carving pumpkins (we used faux pumpkins by Funkin)
painter's tarp
6 to 9 battery-operated tea lights
4 colors of craft paint (we used green, blue, black, white)
small artist paintbrush
dry-erase marker


Clean Out the Pumpkins

Cut a hole in the bottom of each pumpkin and clean out the innards.


Dry-Fit the Stack and Create Pattern

Place the pumpkins on top of each other. Use a dry-erase marker (washable marker) to draw a chevron pattern across the middle of each pumpkin a little more than halfway around the pumpkin. Do not draw your pattern all the way around whole thing. Disassemble the stack and mark which is the top, middle and bottom.


Carve Part of the Pattern

Use a serrated knife or jigsaw to cut the patterns. If using a jigsaw, drill a hole first, then insert the jigsaw blade before turning it on. On each pattern, leave two stabilizers to help handle the weight of the other pumpkins (so it doesn't fold down on itself).


Paint the Rest of the Pattern

Paint two zigzag patterns above and two below the cut-out pattern, using four different paint colors. Repeat on the other two pumpkins. We put each color in the same exact location on each pumpkin. Let the paint dry completely.


We turned three plain pumpkins into a glowing centerpiece to light up a front porch, Halloween party or Thanksgiving table.


To make this festive centerpiece, we drilled holes in the pumpkins, painted them silver then added some holiday lights and a few crystals.

Tools and Materials

serrated knife
drill with large bit (optional)
scissors
extension cord
3 carving pumpkins (we used faux pumpkins by Funkin)
holiday lights with 25 to 50 clear bulbs
brilliant metal spray paint
3 strands of wire with crystal beads
dry-erase marker
painter's tarp


Carve and Cut

Carve a hole in the bottom and the top of the three pumpkins and remove the innards. On the bottom pumpkin, make the hole a little to the side so the light strand's plug can get through. Do not cut hole near the stem in the top pumpkin. The hole has to be big enough to be able to put your hand in and pull the light strands through the holes.

Mark for Light Holes

Use a dry-erase marker to make small circles where you want the bulbs to come out of the pumpkins.


Cut Light Holes

Use a serrated knife or a drill to cut out the circles. Double check the size by inserting one of the bulb sockets (take the bulb out to test it). Make the hole bigger until the socket can fit through, but not too big — you don't want the bulb to slide out.


Paint

Place the pumpkins on a tarp and spray-paint them with the brilliant metal paint. Let them dry.


Prep the Lights

Check that the lights are working and then remove all the bulbs from their sockets. This will make it easier to thread the strand through the pumpkins.


Thread the Lights

Starting with the bottom pumpkin, pull the sockets through the holes and then screw on the bulb to keep it in place. Make sure you leave enough of the strand to come out of the bottom of the pumpkin and plug into an extension cord or outlet. Work your way up the pumpkin and then come out the top and move into the next pumpkin. Leave some wiggle room in between.


Add Extra Sparkle

Wrap the pumpkins with crystal strands (cut to size if necessary) around the bottom, middle and top to give the topiary a little extra glamour.